Configuring Remote Executor
Overview
This guide will walk you through the process of setting up Remote Executors in your environment, including:
- Understanding Remote Executors and Pools
- Configuration prerequisites
- Creating and managing Executor Pools
- Deploying Remote Executors in your environment
- Assigning Ingestion Sources to Pools
Understanding Remote Executors and Pools
A Remote Executor Pool provides a way to organize and manage your Remote Executors in DataHub. Here's how they work:
- A Remote Executor Pool (or Pool) is a logical grouping of one or more Remote Executors
- Each Remote Executor in a Pool automatically reports its status and health
- Each Ingestion Source can be assigned to a specific Pool
- One Pool can be designated as the Default Pool for new Ingestion Sources
- Multiple Pools can be created for different purposes (e.g., by region, department, or workload type)
Configuration Prerequisites
Before deploying a Remote Executor, ensure you have the following:
DataHub Cloud
- A DataHub User with the Manage Metadata Ingestion Platform privilege
- A DataHub Remote Executor Access Token (generate from Settings > Access Tokens > Generate new token > Remote Executor)
- Your DataHub Cloud URL (e.g.,
<your-company>.acryl.io/gms). NOTE: you MUST include the trailing/gmswhen configuring the executor.
Deployment Environment
- Access to your deployment platform (AWS ECS or Kubernetes)
- Necessary permissions to create resources
Network Connectivity
The Remote Executor requires outbound HTTPS (port 443) connectivity only — no inbound connectivity is needed. Ensure the following endpoints are reachable from your deployment environment:
https://<your-company>.acryl.io/*— DataHub GMS APIhttps://sqs.*.amazonaws.com/*— AWS SQS, used for remote execution task dispatch- A Python package index—for production, prefer an internal mirror (with egress or firewall rules that enforce your supply-chain policy rather than open access to arbitrary public indexes). Details: Ingestion executor security and hardening.
- A container registry hosting the DataHub Remote Executor image (e.g., AWS ECR or
docker.datahub.com)
Registry Access
- For AWS: Provide your AWS account ID to DataHub Cloud
- For Kubernetes: Work with DataHub team to set up access to the Remote Executor Docker Image Registry
Creating and Managing Executor Pools
Complete the following steps to create a new Executor Pool from the DataHub Cloud UI:
- Navigate to the Data Sources section on the left sidebar
- Click the Executors tab and click Create

- Configure Pool settings:
- Pool Identifier: A unique identifier for this Pool
- Description: Purpose or details about the Pool
- Default Pool: Optionally set as the Default Pool for new Ingestion Sources

- Click Create to provision the Pool
Deploying Remote Executors in Your Environment
Once you have created an Executor Pool in DataHub Cloud, you are now ready to deploy an Executor within your environment.
Work with DataHub team to receive deployment templates specific to your environment (Helm charts, CloudFormation, or Terraform) for deploying Remote Executors in this Pool.
Custom images with additional connectors
Remote Executor (datahub-executor) images use the same bundled venv mechanism as DataHub Core datahub-actions: connector installs are baked under /opt/datahub/venvs at image build time via variables such as BUNDLED_VENV_PLUGINS and BUNDLED_CLI_VERSION. To run sources that need extra dependencies, work with DataHub Cloud for an image built with your plugin list. Details: Bundled ingestion virtual environments.
Deploy on Amazon ECS
- AWS Account Configuration
To access the private DataHub Cloud ECR registry, you'll need to provide your AWS account ID to DataHub Cloud. You can securely share your account ID through:
- Your DataHub Cloud representative
- A secure secret-sharing service like One Time Secret
This step is required to grant your AWS account access to pull the Remote Executor container image.
- Configure CloudFormation Template
The DataHub Team will provide a Cloudformation Template that you can run to provision an ECS cluster with a single remote ingestion task. It will also provision an AWS role for the task which grants the permissions necessary to read and delete from the private queue created for you, along with reading the secrets you've specified. At minimum, the template requires the following parameters:
- Deployment Location (VPC and subnet)
- DataHub Personal Access Token
- DataHub Cloud URL (e.g.,
<your-company>.acryl.io/gms) - Executor Pool ID you set in the DataHub UI
- Optional: DataHub Cloud Remote Executor Version; defaults to latest
Optional parameters:
- Source Secrets:
SECRET_NAME=SECRET_ARN(up to 10); separate multiple secrets by comma, e.g.SECRET_NAME_1=SECRET_ARN_1,SECRET_NAME_2,SECRET_ARN_2. - Environment Variables:
ENV_VAR_NAME=ENV_VAR_VALUE(up to 10); separate multiple variable by comma, e.g.ENV_VAR_NAME_1=ENV_VAR_VALUE_1,ENV_VAR_NAME_2,ENV_VAR_VALUE_2.
When you wire local secrets into the executor (ECS SECRET_NAME=SECRET_ARN, Kubernetes mounts, or runtime AWS/GCP Secret Manager), credentials stay in your environment and are not stored in DataHub. Reference them in ingestion source configs using ${SECRET_NAME}. This is different from DataHub UI Secrets — see Secret security considerations.
Deploy Stack
# Using AWS CLI

 aws --region us-east-1 cloudformation create-stack \
   --stack-name datahub-remote-executor \
   --template-body file://datahub-executor.ecs.template.yaml \
   --capabilities CAPABILITY_AUTO_EXPAND CAPABILITY_NAMED_IAM \
   --parameters ParameterKey=ExecutorPoolId,ParameterValue="remote" \
   ParameterKey=VPCID,ParameterValue="<your-vpc>" \
   ParameterKey=SubnetID,ParameterValue="<your-subnet>" \
   ParameterKey=DataHubBaseUrl,ParameterValue="https://<your-company>.acryl.io/gms" \
   ParameterKey=DataHubAccessToken,ParameterValue="<your-remote-executor-access-token>"
Or use the CloudFormation Console
Configure Secrets (Optional)
# Create a secret in AWS Secrets Manager

aws secretsmanager create-secret \
  --name my-source-secret \
  --secret-string '{"username":"user","password":"pass"}'
Update Amazon ECS Deployment
To update your Remote Executor deployment (e.g., to deploy a new container version or modify configuration), you'll need to update your existing CloudFormation Stack. This process involves re-deploying the CloudFormation template with your updated parameters while preserving your existing resources.
Access CloudFormation
- Navigate to the AWS CloudFormation Console
- Locate and select your Remote Executor stack
- Click the Update button
Update Template
- Select Replace current template
- Choose Upload a template file
- Download the latest DataHub Cloud Remote Executor CloudFormation Template
- Upload the template file
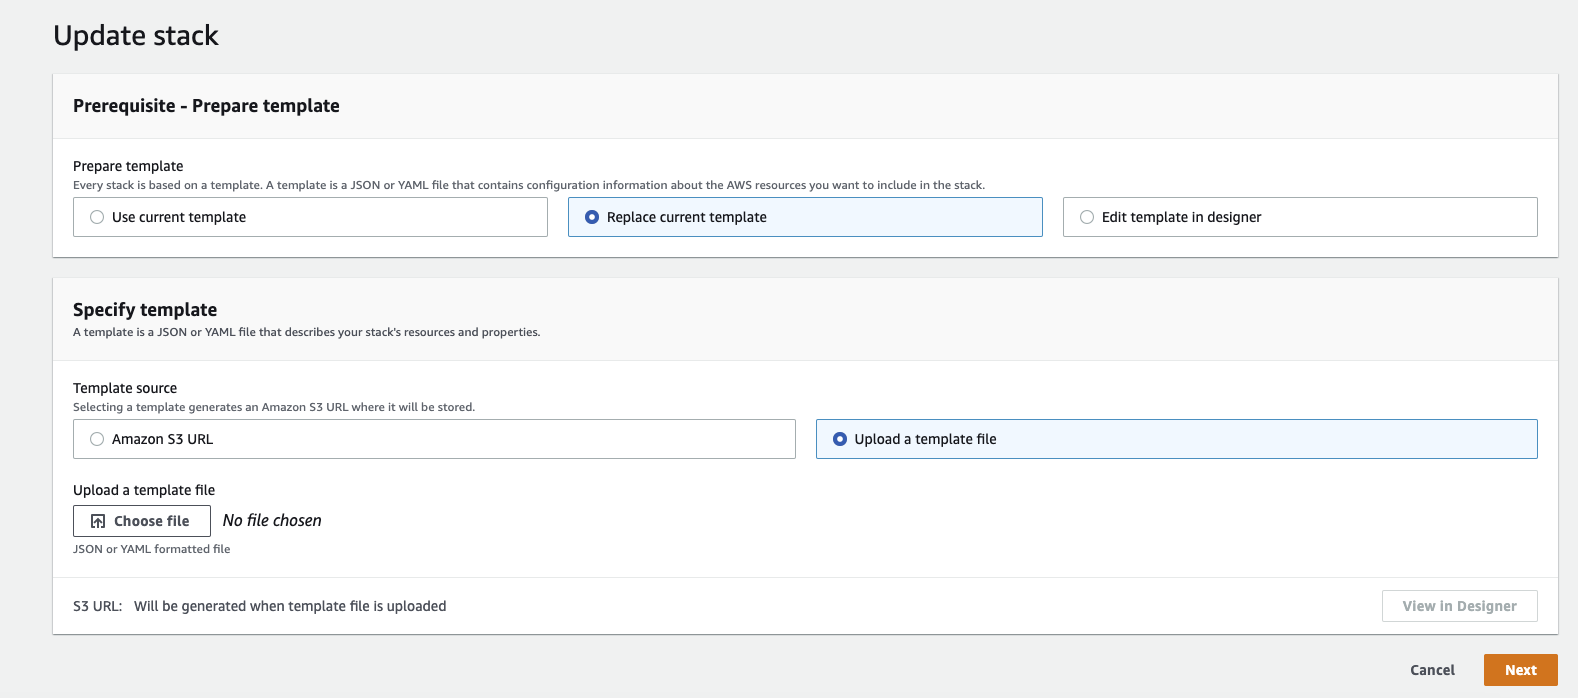
Configure Parameters
- Review and update parameters as needed:
ImageTag: Specify a new version if upgradingDatahubGmsURL: Verify your DataHub URL is correct- Other parameters will retain their previous values unless changed
- Click Next to proceed
- Review and update parameters as needed:
Review and Deploy
- Review the configuration changes
- Acknowledge any capabilities if prompted
- Click Update stack to begin the update process
The update process will maintain your existing resources (e.g., secrets, IAM roles) while deploying the new configuration. Monitor the stack events to track the update progress.
Deploy on Kubernetes
The datahub-executor-worker Helm chart provides a streamlined way to deploy Remote Executors on any Kubernetes cluster, including Amazon EKS and Google GKE.
- Registry Access Configuration
To access the private DataHub Cloud container registry, you'll need to work with your DataHub Cloud representative to set up the necessary permissions:
For AWS EKS: Provide the IAM principal that will pull from the ECR repository
- For Google Cloud: Provide the cluster's IAM service account
- For other platforms: Contact DataHub team for specific requirements
- Configure Access Token Secret
Create the required secret in your Kubernetes cluster:
# Create DataHub PAT secret (required)
# Generate token from Settings > Access Tokens in DataHub UI
kubectl create secret generic datahub-access-token-secret \
  --from-literal=datahub-access-token-secret-key=<DATAHUB-ACCESS-TOKEN>
- Install Helm Chart
Add the DataHub Cloud Helm repository and install the chart:
# Add Helm repository
helm repo add acryl https://executor-helm.acryl.io
helm repo update

# Install the chart
helm install \
  --set global.datahub.executor.pool_id="remote" \
  --set global.datahub.gms.url="https://<your-company>.acryl.io/gms" \
  acryl-executor-worker acryl/datahub-executor-worker
Required parameters:
global.datahub.executor.pool_id: Your Executor Pool IDglobal.datahub.gms.url: Your DataHub Cloud URL (must include/gms)
- Configure Secret Mounting (Optional)
Starting from DataHub Cloud v0.3.8.2, you can manage secrets using Kubernetes Secrets. This enables runtime secret updates without executor restarts.
Create a Kubernetes secret:
# Create source credentials (optional)
kubectl create secret generic datahub-secret-store \
  --from-literal=REDSHIFT_PASSWORD=password \
  --from-literal=SNOWFLAKE_PASSWORD=password
Mount the secret in your values.yaml:
extraVolumes:
  - name: datahub-secret-store
    secret:
      secretName: datahub-secret-store
extraVolumeMounts:
  - mountPath: /mnt/secrets
    name: datahub-secret-store
To mount secrets from one or more Kubernetes Secrets, rename hyphenated keys, and combine them into /mnt/secrets, use subPath:
extraVolumes:
  - name: snowflake-secret
    secret:
      secretName: my-snowflake-secret
  - name: postgres-secret
    secret:
      secretName: my-postgres-secret
extraVolumeMounts:
  - mountPath: /mnt/secrets/MY_SNOWFLAKE_PRIVATE_KEY
    name: snowflake-secret
    subPath: snowflake-private-key
    readOnly: true
  - mountPath: /mnt/secrets/MY_SNOWFLAKE_PRIVATE_KEY_PASSWORD
    name: snowflake-secret
    subPath: snowflake-private-key-password
    readOnly: true
  - mountPath: /mnt/secrets/SOME_POSTGRES_PASSWORD
    name: postgres-secret
    subPath: postgres-password
    readOnly: true
This mounts only the specified keys and renames them to valid secret names (underscores instead of hyphens).
Naming conventions:
- Use
UPPER_CASEnames for mounted secret files (e.g.,DB_PASSWORD,API_KEY) - Secret substitution is case-sensitive:
${DB_PASSWORD}and${db_password}are different and must match the filename exactly - No whitespace or special characters with the exception of underscores (see Secret Resolution)
- Secrets must be flat files directly in
/mnt/secrets/—nested paths, relative paths, etc. are not supported
See Kubernetes Secrets documentation for more volume mount options.
Secret Configuration:
- Default mount path:
/mnt/secrets(override withDATAHUB_EXECUTOR_FILE_SECRET_BASEDIR) - Default file size limit: 1MB (override with
DATAHUB_EXECUTOR_FILE_SECRET_MAXLEN) - Reference secrets in ingestion recipes using
${SECRET_NAME}syntax - Important: Secret names must not contain whitespace or special characters with the exception of underscores. See Secret Resolution for details.
Example ingestion recipe using mounted secrets:
source:
  type: redshift
  config:
    host_port: "<redshift-host:port>"
    username: connector_test
    password: "${REDSHIFT_PASSWORD}"
    # ... other configuration ...
For additional configuration options, refer to the values.yaml file in the Helm chart repository.
Update Kubernetes Deployment
To update your Kubernetes deployment (e.g., to deploy a new image version or modify configuration), you'll need to upgrade your existing Helm release. This process involves upgrading the Helm release with any new parameters while preserving your existing parameters.
- Upgrade Helm release
# Update Helm repository
helm repo update acryl

# Upgrade your existing Helm release
# See https://helm.sh/docs/helm/helm_upgrade/ for more options
helm upgrade \
  --reuse-values \
  --set <key>="<value>" \ # if any new options need to be set
  acryl-executor-worker acryl/datahub-executor-worker
For configuration options, refer to the values.yaml file in the Helm chart repository.
Deploy using Docker
The Remote Executor image can be run directly using Docker, though this is not recommended for production scenarios. The following example is provided for testing purposes or as an example configuration for setting up Remote Executor in high-availability environments other than Kubernetes or AWS ECS:
- Registry Access Configuration
To access the private DataHub Cloud container registry, you'll need to contact your DataHub Cloud representative for specific requirements.
- Run Docker Container
Run the Docker container:
docker run -it \
    --env DATAHUB_GMS_URL="https://<your-company>.acryl.io" \
    --env DATAHUB_GMS_HOST="<your-company>.acryl.io" \
    --env DATAHUB_GMS_TOKEN="<token>" \
    --env DATAHUB_EXECUTOR_POOL_ID="remote" \
    --env DATAHUB_EXECUTOR_MODE=worker \
    --name acryl-executor-worker \
    <docker-image>
Required parameters:
DATAHUB_GMS_URL: Your DataHub Cloud URL (must start withhttps://)DATAHUB_GMS_HOST: Your DataHub Cloud URL (raw domain name)DATAHUB_GMS_TOKEN: Your Remote Executor Access TokenDATAHUB_EXECUTOR_POOL_ID: Your Executor Pool ID
Checking Remote Executor status
Once you have successfully deployed the Remote Executor in your environment, DataHub will automatically begin reporting Executor Status in the UI:

Assigning Ingestion Sources to an Executor Pool
After you have created an Executor Pool and deployed the Remote Executor within your environment, you are now ready to configure an Ingestion Source to run in that Pool.
- Navigate to Manage Data Sources in DataHub Cloud
- Edit an existing Source or click Create new source
- In the Finish Up step, expand the Advanced to select your desired Executor Pool

New Ingestion Sources will automatically use your designated Default Pool if you have assigned one. You can override this assignment when creating or editing an Ingestion Source at any time.
- Click Save & Run. The task should show as 'Running' if properly configured.

Using Cloud Secret Managers
You can configure the Remote Executor to resolve secrets directly from AWS Secrets Manager or GCP Secret Manager at runtime. This lets you manage credentials in your cloud provider instead of storing them inside DataHub. Secrets resolved this way are available to all executor workflows, including ingestion and assertions.
This is different from the AWS Secrets Manager integration used by the ECS CloudFormation deployment, where secrets are wired into the executor container at deploy time via the SECRET_NAME=SECRET_ARN template parameter. That mechanism still works as before and requires the ECS task to be restarted whenever a secret value changes. The integration described in this section runs inside the executor itself, looks up secrets on demand, and applies to both ECS and Kubernetes deployments.
Secrets are referenced using the standard ${SECRET_NAME} syntax — no changes needed to existing configurations. The executor automatically prepends a configurable prefix (default: datahub-) when looking up secrets. For example, ${SNOWFLAKE_PASSWORD} resolves to a secret named datahub-SNOWFLAKE_PASSWORD in your cloud provider. You can override this prefix using DATAHUB_EXECUTOR_AWS_SM_PREFIX (for AWS) or DATAHUB_EXECUTOR_GCP_SM_PREFIX (for GCP) — for example, setting it to myapp- would resolve ${SNOWFLAKE_PASSWORD} to myapp-SNOWFLAKE_PASSWORD instead.
Naming Rules for Secrets and Prefixes
The full secret name looked up in your cloud provider is <prefix><variable-name>. Each part has its own rules:
Variable name (the <variable-name> part inside ${...} in your recipe)
The recipe parser extracts variables using the regex \${(\w+)}, where \w matches only [A-Za-z0-9_]. This means:
- ✅ Allowed: ASCII letters, digits, and underscores (e.g.,
${SNOWFLAKE_PASSWORD},${db_user_1}) - ❌ Not allowed: hyphens, dots, slashes,
@,+,=, or any other special character
Use UPPER_SNAKE_CASE or lower_snake_case for variable names.
For full details on recipe variable syntax (including bash-style defaults), see Secret Resolution in Recipes.
Prefix (DATAHUB_EXECUTOR_AWS_SM_PREFIX / DATAHUB_EXECUTOR_GCP_SM_PREFIX)
The prefix must match ^[A-Za-z0-9_-]*$ — letters, digits, underscores, and hyphens. This is the intersection of AWS Secrets Manager and GCP Secret Manager naming rules and is enforced at startup; an invalid prefix causes the executor to fail with a configuration error. A non-empty prefix is recommended so the executor's IAM permissions can be scoped to a name pattern (see the IAM examples below).
Combined cloud secret name (<prefix><variable-name>)
Examples
| Recipe reference | Prefix | Cloud secret name | Result |
|---|---|---|---|
${SNOWFLAKE_PASSWORD} | datahub- | datahub-SNOWFLAKE_PASSWORD | ✅ Resolved |
${db_user_1} | prod_ | prod_db_user_1 | ✅ Resolved |
${SNOWFLAKE_PASSWORD} | (empty) | SNOWFLAKE_PASSWORD | ✅ Resolved |
${snowflake-password} | datahub- | (never extracted) | ❌ Literal passed through |
${snowflake.password} | datahub- | (never extracted) | ❌ Literal passed through |
AWS Secrets Manager
1. Create your secrets
Store each credential as a plain string value:
aws secretsmanager create-secret --region us-west-2 \
  --name "datahub-SNOWFLAKE_PASSWORD" \
  --secret-string "my-secret-value"
2. Grant the executor IAM permissions
The pod running the executor needs the following IAM permissions. Attach this policy to the pod's IAM role (IRSA on EKS, or Task Role on ECS):
{
  "Version": "2012-10-17",
  "Statement": [
    {
      "Effect": "Allow",
      "Action": [
        "secretsmanager:BatchGetSecretValue",
        "secretsmanager:GetSecretValue"
      ],
      "Resource": "arn:aws:secretsmanager:<region>:<account-id>:secret:datahub-*"
    },
    {
      "Effect": "Allow",
      "Action": "secretsmanager:ListSecrets",
      "Resource": "*"
    }
  ]
}
If you use a custom prefix, update the Resource pattern to match (e.g., myapp-* instead of datahub-*).
3. Enable on the executor
Set these environment variables on the executor:
| Variable | Required | Default | Description |
|---|---|---|---|
DATAHUB_EXECUTOR_AWS_SM_ENABLED | Yes | false | Set to true to enable |
DATAHUB_EXECUTOR_AWS_SM_REGION | Yes | — | AWS region (e.g., us-west-2) |
DATAHUB_EXECUTOR_AWS_SM_PREFIX | No | datahub- | Prefix prepended to secret names |
DATAHUB_EXECUTOR_SECRET_CACHE_TTL | No | 21600 | Cache duration in seconds (default: 6 hours) |
Helm example:
extraEnvs:
  - name: DATAHUB_EXECUTOR_AWS_SM_ENABLED
    value: "true"
  - name: DATAHUB_EXECUTOR_AWS_SM_REGION
    value: "us-west-2"
For IRSA, annotate the service account:
serviceAccount:
  annotations:
    eks.amazonaws.com/role-arn: "arn:aws:iam::<account-id>:role/<executor-role>"
GCP Secret Manager
1. Create your secrets
echo -n "my-secret-value" | gcloud secrets create "datahub-SNOWFLAKE_PASSWORD" \
  --project="<project-id>" --data-file=-
2. Grant the executor access to secrets
Grant the Secret Manager Secret Accessor role (roles/secretmanager.secretAccessor) to the executor's GCP service account. On GKE, use Workload Identity to bind a Kubernetes service account to a GCP service account.
The following command grants access to all secrets with the datahub- prefix. Update the prefix if you configured a custom one:
gcloud projects add-iam-policy-binding "<project-id>" \
  --member="serviceAccount:<sa>@<project-id>.iam.gserviceaccount.com" \
  --role="roles/secretmanager.secretAccessor" \
  --condition='expression=resource.name.startsWith("projects/<project-id>/secrets/datahub-"),title=DataHub executor secrets'
3. Enable on the executor
| Variable | Required | Default | Description |
|---|---|---|---|
DATAHUB_EXECUTOR_GCP_SM_ENABLED | Yes | false | Set to true to enable |
DATAHUB_EXECUTOR_GCP_SM_PROJECT_ID | Yes | — | GCP project ID |
DATAHUB_EXECUTOR_GCP_SM_PREFIX | No | datahub- | Prefix prepended to secret names |
DATAHUB_EXECUTOR_SECRET_CACHE_TTL | No | 21600 | Cache duration in seconds (default: 6 hours) |
Helm example:
extraEnvs:
  - name: DATAHUB_EXECUTOR_GCP_SM_ENABLED
    value: "true"
  - name: DATAHUB_EXECUTOR_GCP_SM_PROJECT_ID
    value: "my-gcp-project"

serviceAccount:
  annotations:
    iam.gke.io/gcp-service-account: "<sa>@<project-id>.iam.gserviceaccount.com"
Secret security considerations
Security-conscious Remote Executor deployments should keep credentials local to your environment rather than in DataHub UI Secrets.
DataHub ships with SECRET_SERVICE_CALLER_GUARD_MODE=ENFORCE. Browser sessions and user Personal Access Tokens cannot call getSecretValues or otherwise decrypt secrets through human-facing API paths. On DataHub OSS, scheduled UI ingestion uses datahub-actions with system client credentials for the same trusted-worker path. You only need to change this setting for a staged rollout (AUDIT) or break-glass incident response (DISABLED, administrator approval required).
Secrets created in the DataHub UI are encrypted at rest in DataHub, but when a Remote Executor resolves ${SECRET_NAME} against the DataHub secret backend, GMS decrypts the value and returns it in plaintext over the DataHub API (protected by TLS). The credential transits from DataHub Cloud back into your executor at runtime.
This is convenient for getting started, but weaker than local secret backends for deployments where credentials must not leave your environment boundary.
Recommended approach (local secrets)
For production Remote Executor pools, prefer:
- Kubernetes Secrets mounted at
/mnt/secrets/— see Configure Secret Mounting - Runtime AWS Secrets Manager or GCP Secret Manager — see Using Cloud Secret Managers
- ECS deploy-time secrets via CloudFormation
SECRET_NAME=SECRET_ARN - Environment variables on the executor container
Use an embedded executor access token when configuring the worker — not a user-issued Personal Access Token.
Discouraged approach (DataHub UI Secrets)
Avoid creating secrets in the DataHub UI Secrets tab for ingestion sources assigned to Remote Executor pools. If a UI secret shares a name with a locally mounted secret, the DataHub backend takes precedence — see Secret Resolution.
Caller guard modes (override only when needed)
GMS enforces a caller guard on SecretService decryption. The default is secure by default — no configuration required for production:
| Value | Behavior |
|---|---|
ENFORCE | Blocks getSecretValues for browser sessions, user PATs, and other non-embedded-executor callers (default). |
AUDIT | Allows decryption but logs a warning — use only for staged rollout before enforcing. |
DISABLED | No enforcement — break-glass only; contact your DataHub administrator to enable on request. |
ENFORCE prevents humans and user PATs from fetching secret values via GraphQL, but does not block an embedded executor from resolving UI secrets. To avoid UI secrets entirely, do not create them and use local backends above.
See Environment Variables and Updating DataHub for migration details.
Advanced: Performance Settings and Task Weight-Based Queuing
Executors use a weight-based queuing system to manage resource allocation efficiently:
- Default Behavior: With 4 ingestion threads (default), each task gets a weight of 0.25, allowing up to 4 parallel tasks
- Resource-Intensive Tasks: Tasks can be assigned a higher weight (up to 1.0) to limit parallelism
- Queue Management: If the total weight of running tasks exceeds 1.0, new tasks are queued until capacity becomes available
- Priority Tasks: Setting a weight of 1.0 ensures exclusive resource access - the task will run alone until completion
The following environment variables can be configured to manage memory-intensive ingestion tasks, prevent resource contention, and ensure stable execution of resource-demanding processes:
DATAHUB_EXECUTOR_INGESTION_MAX_WORKERS(default: 4) - Maximum concurrent Ingestion tasksDATAHUB_EXECUTOR_MONITORS_MAX_WORKERS(default: 10) - Maximum concurrent Observe monitoring tasksEXECUTOR_TASK_MEMORY_LIMIT- Memory limit per task in kilobytes, configured per Ingestion Source under Extra Environment Variables. This setting helps prevent the executor's master process from being OOM-killed and protects against memory-leaking ingestion tasks. Example configuration:{ "EXECUTOR_TASK_MEMORY_LIMIT": "128000000" }EXECUTOR_TASK_WEIGHT- Task weight for resource allocation, configured per Ingestion Source under Extra Environment Variables. By default, each task is assigned a weight of 1/MAX_THREADS (e.g., 0.25 with 4 threads). The total weight of concurrent tasks cannot exceed 1.0. Example configuration for a resource-intensive task:{ "EXECUTOR_TASK_WEIGHT": "1.0" }
Troubleshooting
Common Issues
Connection Failed
- Verify network connectivity
- Check DataHub URL configuration
- Validate Executor Pool ID
- Validate access token
Secret Access Failed
- Confirm secret ARNs/names
- Check permissions
- Verify secret format
Container Failed to Start
- Check resource limits
- Verify registry access
- Review container logs
Frequently Asked Questions
Do AWS Secrets Manager secrets wired in via CloudFormation automatically update in the executor?
No. When using the ECS CloudFormation deployment, secrets passed via the SECRET_NAME=SECRET_ARN template parameter are wired into the executor container at deployment time. The ECS Task needs to be restarted when those secrets change.
Do values resolved by the runtime Cloud Secret Manager integration automatically update in the executor?
Yes, with a delay. When the executor uses the runtime Cloud Secret Manager integration (AWS Secrets Manager or GCP Secret Manager), resolved values are cached in memory with a 6-hour TTL by default (configurable via DATAHUB_EXECUTOR_SECRET_CACHE_TTL). After you update a secret in AWS or GCP, the executor picks up the new value once the cache entry expires.
Each executor workflow (ingestion, assertions, monitor training) uses its own secret manager instance, so caches are not shared between them. They all follow the same TTL behavior, but each instance expires independently from when it first cached a given value.
To force an immediate refresh across all workflows, restart the executor.
How can I verify successful deployment?
For ECS deployments, check AWS Console:
- Navigate to ECS > Cluster > Stack Name > Services > Logs
- Look for the log line:
Starting datahub executor worker
This indicates successful connection to DataHub Cloud.